It's beginning to look a lot like Christmas! I love advent calenders and have wanted to make one for years, but finding a reusable one with big enough pockets for 3 treats-one for each kid, is a mission. So I gave up and would buy the cheap disposable ones with the plastic-y tasting chocolate inside for a couple of dollars.
Recently while looking up Christmas craft ideas I came across this post on Pinterest
and thought it was perfect! After all it is completely made using empty toilet rolls, which I always have an abundance of because a) there are 5 of us, b) they are free!, and c) there are so many great crafts you can make with them.
Best of all, it is made with up cycled items AND I can easily fit 3 chocolates or lollies in the cylinders. Winning!
So here's how to make one:
First I gathered 24 toilet rolls. Squeezed one of the open ends shut and sewed it closed on my sewing machine. Like this..
Sorry about the photo, I had to screen shot it from my IG account. I had deleted it from my camera because I didn't want to be a weirdo who had pictures of empty toilet rolls on her phone!
You could also staple the ends shut or use hot glue.
Next I painted each one. I decided to do half of the rolls red and the other half green. I just used poster paints we had in the cupboard. The paint sinks in to the cardboard easily so I gave each one 2 coats and let them dry.
After this stage, I'll be honest- I had no idea how I was going to decorate them. All I knew was that I didn't want to go out and buy anything for this project. Then I looked through my Christmas gift wrap stash and found some ribbon to decorate them. I used a thick ribbon with a candy cane print which was perfect. So I measured and cut each piece to fit around the middle of the cardboard roll, then hot glued it in place.
 |
| My helper |
Now to make the numbers. We had some Christmas printed paper which would be ideal, so I used a soft drink bottle lid to trace 24 circle shapes, then Mr 9 helped me cut them out.
Then I used some old scrap booking stickers which had numbers on them to put the numbers 1-24 on each circle, then hot glued each one on to a toilet roll. You could also use plain paper and draw the numbers on yourself. Just use what ever you have lying around :)
 | |||||
| Here's a closer look. |
I have a large pin up board we use for home ed, so this made a perfect base for the calendar and I used some pegs I got for free on Gumtree to clip them on. You could also just hang a few rows of string on your wall and peg each cylinder to the string. Or punch a hole in each cardboard tube and thread the string through each hole to hang.
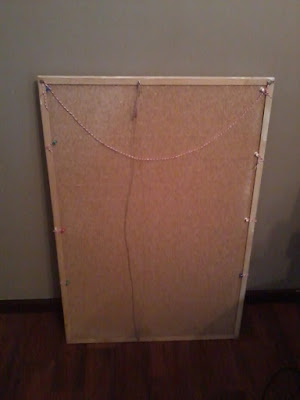
My board was big enough to fit 4 rows, so I measured the string allowed for some draping on each row and pinned it in the back of the board.
 | ||||
| 4 pins placed on each side of the back of the board. The string visible here is for hanging. |
Then added another length of string and looped it onto the top pins-this would be for hanging.
 | |||
| Finished! I added a bow to cover up the screw in my wall. |
The calendar is finished and ready to fill. I've found one Freddo frog or small sized chocolate will fit inside or a couple of lollies. My kids like chocolate so I'm using some freckles, mixed buddies and a few small foil Santas I bought in last years post-Christmas sales. By the way, you can store chocolate for a long time if kept in a cool, dark spot.
We are all looking forward to the 1st of December - yes even the teens still want their advent treats!


No comments:
Post a Comment